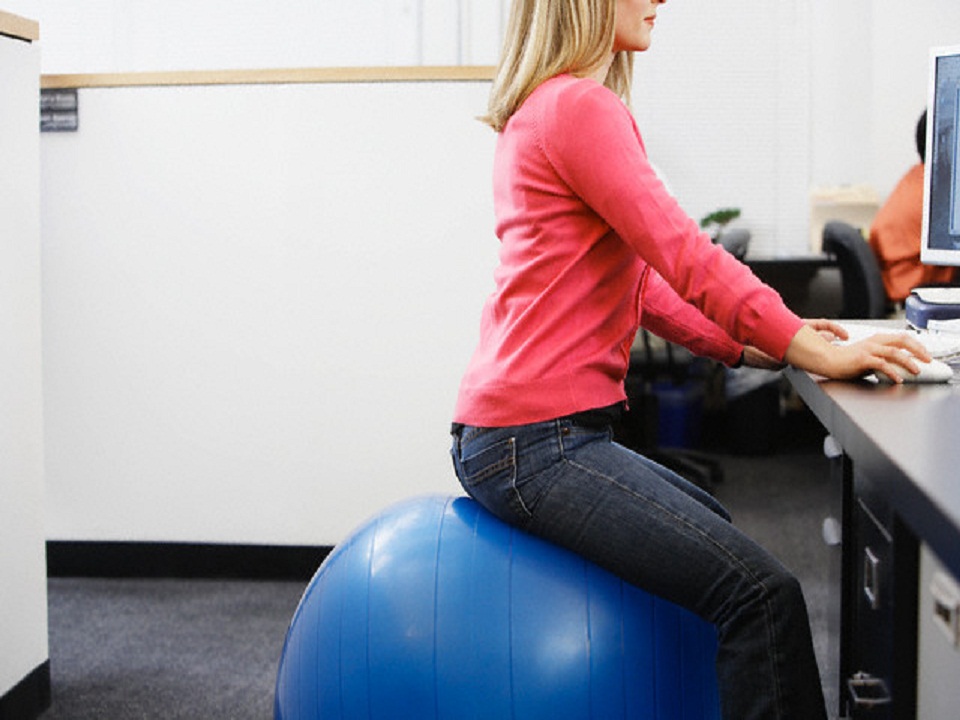
How Shashi Tharoor helped me to lose weight

I was never obese. In fact, I was pretty lean all through my college years. However 10 years into professional life, I had picked up some inches here, a few pounds there, making me miss my old body. Working out was the obvious choice. Being a physiotherapist and a physiotherapy educator, exercises are my bread and butter. Yet, my exercise adherence was not very good. I used to run during my student life but years of inactivity meant I was gasping for breath within minutes, whenever I tried to run. My other efforts consisted joining a gym for a short time, buying a set of barbells and dumbbells and trying to follow exercise videos of various categories.

My yearning for fitness was genuine but the processes I was trying could not excite me enough to continue for a long time. Once the initial excitement was over I would fall back to my old routine, initially with guilt which soon gave way to indifference.


One day during that period I was dragging myself through a walk, trying to play some music on youtube via headphone. While surfing through the videos I stumbled upon Shashi Tharoor’s Oxford Union speech. Listening to his demands of reparations for British atrocities on colonial India kept me interested as I walked. I tried the same strategy successfully the next day and soon it became a routine.


The good thing about Tharoorian speeches is, apart from being funny, informative, and insightful, they are also very lengthy. Where most people would give a one-sentence answer, Mr. Tharoor would first explain the context, give a longish answer with some witty anecdote, and then provide a summary as well! Often his videos were more than an hour long. Every morning I would play one of them as I would walk around our township.


Eventually, the morning walks with youtube became a regular part of my daily life and allowed me to achieve a leaner body. Of course, at some point in time, I started to look beyond Shashi Tharoor to other speakers. My present routine is a variation of the previous one, which consists of treadmill walk with Netflix. But I still feel grateful to Mr. Shashi Tharoor. I have never voted for his party, but if you need an hour of immersive walking experience, my vote will go towards one of his videos.

What’s in it for you?
I guess the message I am trying to convey is, to be healthy one must commit to a long-term physical activity routine. Not every exercise appeals to every individual. Each one has his/her own choice of physical activity. Sometimes you need to try out a few of them before you can find ‘the one’. To quote Steve Jobs, “If you haven’t found it yet, keep looking. Don’t settle. As with all matters of the heart, you’ll know when you find it.”

May you find your Shashi Tharoor (or equivalent).

What exercise routine works for you? Kindly mention in the comments section. Keep watching this place daily for easy and effective health tips.

About the author

This image has an empty alt attribute; its file name is IMG_20190415_114220_049_2.jpg

Dr Subhanjan Das (PT)

BPT, MPT (MSk & Sports), CMP(NZ), Diploma in football medicine (FIFA)

Consultant Physiotherapist of Apollo & Reliva Clinic, HSR Layout, Bangalore

Contact: +91 8967549104

Dr Subhanjan Das (PT) has over 14 years of clinical and 12 years of academic experience.  A friendly professional with lots of patience and skilful hands, Dr Subhanjan has worked with thousands of his patients for instant relief of pain and rapid return to activities.  He has treated elite athletes for recovery, injury prevention and performance enhancement.

Dr Das is specialized in Orthopaedic and sports physiotherapy and has keeps himself updated with the latest advancements in the field of physiotherapy. He has undergone training on advanced orthopaedic techniques such as Dry Needling, Mulligan Concept, McKenzie method, Pilates, Cupping therapy, McConnel and kinesio  taping from the best faculties around the world.

Dr Das has taught in 5 universities across India and has trained physiotherapists in 50+ workshops within and outside India.

Healthier you by 2021: 60 Days 60 steps- Day 3

Text neck syndrome: Finally a solution that works

(This blogpost is the third instalment of a 60 part series. In case you have missed the previous ones, the First part talks about strategies to improve water intake, the second part: Draws inspiration from ‘Nudge’ and ‘Atomic habits’ and recommends 3 one-time actions for lasting health benefits)

Text neck syndrome needs no introduction. It is estimated that about 35% of all smartphone users suffer from text neck syndrome. Considering that India has more than 500 million smartphone users, the number of people suffering from text neck syndrome would be astounding.

Text neck syndrome produces neck pain because while using the smartphone we keep our neck bent. With increasing neck angle the apparent weight of the head also increases loading the neck excessively, producing neck pain.
On paper it is not very difficult to tackle text neck syndrome. Just reduce the use of smartphones and you are all set. However, we all know that it’s easier said than done.

This doesn’t work

The often recommended posture of using a smartphone purported to prevent text neck syndrome where you bring your phone to the eye level by using your shoulder muscles is also of no use. It doesn’t work because shoulder muscles are not meant to work for a prolonged period of time without any rest.

WHAT CAN YOU DO?
1.Support your elbow as you bring your phone near the eye level. You should aim to keep the neck as straight as possible

  1. Change the hand frequently
Supporting the elbow takes the load off from neck and Shoulder

Supporting the elbow takes the load off from neck and Shoulder allowing you (and me) to indulge in your smartphone addiction without pain for a longer period without pain. Depending on your posture you can support the elbow using multiple strategies. In standing crossing the arms makes it possible to support the elbow of the phone holding hand.

The arm rest works well
The knee is another option in crossed sitting
Use the table whenever you can

In sitting position you can use the armrest of the chair when available. Otherwise, cross your leg and use the knee as elbow rest. If you have a table in front, elbow support becomes much easier.

Use whatever support that is available

Actually, with a bit of common sense, you can implement this plan of supporting the elbow in any posture.

Caution: Even if you can prevent the text neck, overuse of smartphone still remains injurious to health.

Do you have any other strategy to reduce stress on the neck while using phone? Kindly post in the comment section.

Keep watching this place daily for easy and effective health tips.

One time action: 10 minutes today, healthier for life

One of my all-time favourite books is ‘Atomic habits’ by James Clear. In this book the habit expert explains various strategies to build good habits and easily discard the bad ones. One of the strategies that I find particularly useful is to take one-time actions that have far reaching positive consequences.

Example of this could be getting vaccinated.  One shot of vaccine usually provides protection for a long time.

For today’s blog I have three very simple one-time actions picked out. They shouldn’t take more than 10 minutes and will provide you long term health benefits.

What you need to do

(many smartphone/watch users are probably already use these features)

Take out your smartphone and make the following changes:

1. Install a step counter app

2. Install an app that provides hourly beep/chime

3. In digital wellbeing section of the settings make necessary changes to turn the screen black and white half an hour before your scheduled bedtime. iPhone doesn’t provide timed grayscale yet though. You must toggle it manually every time. (Revision: A student of mine tells me that it is very much possible to have timed grayscale feature on iPhone. I stand corrected)

How will this help

All three measures are aimed to nudge you towards a healthier & more active life. Nudge is a concept developed by Richard Thaler, the Nobel Prize winner economist. Nudging is gently guiding someone towards a favourable direction. These one-time activities should nudge you to choose a healthy Lifestyle.

Activity levels

The step counter will tell you about your baseline physical activity level. While the recommended number is 10,000 steps per day most of us fail to reach the target on a regular basis. It is now common knowledge that people with low physical activity level are more likely to get heart diseases, diabetes mellitus and depression. Knowing your step count should motivate you to achieve better numbers. Whatever is your baseline, with a little effort you can improve it by 10% right away without much hardship.

The hourly chimes are another useful tool to prevent sedentary lifestyle.

The urban man spends most of his day in sitting which again predisposes him with all the sedentary lifestyle diseases. This gave rise to the slogan sitting is the new smoking. The hourly chimes can be used as a reminder to prevent prolonged sitting. Even 15 seconds break every hour will be useful to prevent spinal pain and stiffness. The micro breaks can also be used to perform several exercises.

I will provide further strategies related to these exercises in successive posts.

The digital wellbeing setup will create a healthy sleeping habit. Almost everyone who owns a smartphone waste valuable sleep time surfing the net on bed. Over a period of time this meddles with the sleep mechanism and affects the nervous system as a whole.

Combined, these three small changes should improve the health significantly in the long term.

Keep watching this space daily for healthier life.

About the author

This image has an empty alt attribute; its file name is IMG_20190415_114220_049_2.jpg

Dr Subhanjan Das (PT)

BPT, MPT (MSk & Sports), CMP(NZ), Diploma in football medicine (FIFA)

Consultant Physiotherapist of Apollo & Reliva Clinic, HSR Layout, Bangalore

Contact: +91 8967549104

Dr Subhanjan Das (PT) has over 14 years of clinical and 12 years of academic experience.  A friendly professional with lots of patience and skilful hands, Dr Subhanjan has worked with thousands of his patients for instant relief of pain and rapid return to activities.  He has treated elite athletes for recovery, injury prevention and performance enhancement.

Dr Das is specialized in Orthopaedic and sports physiotherapy and has keeps himself updated with the latest advancements in the field of physiotherapy. He has undergone training on advanced orthopaedic techniques such as Dry Needling, Mulligan Concept, McKenzie method, Pilates, Cupping therapy, McConnel and kinesio  taping from the best faculties around the world.

Dr Das has taught in 5 universities across India and has trained physiotherapists in 50+ workshops within and outside India.

ARE YOU DRINKING ENOUGH WATER?


How much water do you drink? I ask this question to all my patients. Surprisingly many don’t have a clue, while most consume far less water than they should.

That brings us to the question, how much water should one drink?
When asked this question I usually come up with a counter question: How much money should one earn?
What I want to imply here is, the amount of water intake depends on requirements. Like Ambanis need to earn crores, an athlete may need to drink 10 liters of water on a match day. But generally speaking anything less than 3 liters and you may fall below the poverty line of water intake. Consider this: your kidneys filter 180 liters of blood in a day, so 3 liters constitutes just around 1.5% of the daily volume.


Why hydration is important?
All the tissues of the body have water as their major ingredient. Dehydration thus creates an overall negative effect in health. Most visible signs of inadequate water intake are constipation, tiredness, poor skin quality and texture, lack of flexibility, cramps, and poor efficiency of muscles.


WHAT YOU CAN DO TODAY ONWARDS:

A. Monitor water intake:
Allot a specific bottle for yourself which constitutes a known quantity of water(1ltr/2ltrs).
today onwards drink water only from that bottle.

B. Try to increase water intake to at least 3 liters every day.

C. Drink water the right way:
Some people can and do gulp down a full bottle of water at one go. That is not an efficient strategy. This is because the excess amount of water is immediately flushed out by the Kidneys. One should drink small quantities of water throughout the day at regular intervals.

Problems with increased water intake:

Frequent urination- in the initial few days to go to the loo often. Over a period of time the body gets adjust to the increased water and this becomes less of an issue.

Urination at night-This problem affects your sleep you may want to time your water intake, reducing it in the latter part of the day. If the doctor has advised reducing water intake: This is sometimes done in certain disease conditions like heart or kidney issues.
Kindly stick to your doctor’s advice.


So that was the healthy step for today.
Come back tomorrow for another easy yet important tip towards better health.

About the author

This image has an empty alt attribute; its file name is IMG_20190415_114220_049_2.jpg

Dr Subhanjan Das (PT)

BPT, MPT (MSk & Sports), CMP(NZ), Diploma in football medicine (FIFA)

Consultant Physiotherapist of Apollo & Reliva Clinic, HSR Layout, Bangalore

Contact: +91 8967549104

Dr Subhanjan Das (PT) has over 14 years of clinical and 12 years of academic experience.  A friendly professional with lots of patience and skilful hands, Dr Subhanjan has worked with thousands of his patients for instant relief of pain and rapid return to activities.  He has treated elite athletes for recovery, injury prevention and performance enhancement.

Dr Das is specialized in Orthopaedic and sports physiotherapy and has keeps himself updated with the latest advancements in the field of physiotherapy. He has undergone training on advanced orthopaedic techniques such as Dry Needling, Mulligan Concept, McKenzie method, Pilates, Cupping therapy, McConnel and kinesio  taping from the best faculties around the world.

Dr Das has taught in 5 universities across India and has trained physiotherapists in 50+ workshops within and outside India.

Setting up the home office: Ergonomics in the time of Corona

Ergonomic sitting for work from home

In my clinical practice I usually get a few techies regularly with aches and pains because of poor ergonomics during work from home. In the present situation with Corona virtually anyone who works on a computer is working from home. As the number of workers and the number of days at home increases probably more people will be affected by similar issues. This post brings a few pointers related to WFH that should help you to work with less strain on your body.

Problems of work from home

Before the Corona outbreak many of us used to view work from home as a privilege for a select few. However work from home has its own set of challenges. The primary problem of WFH is related to poor ergonomics. Most offices have ergonomically designed workstations whereas at home we often don’t have similar facilities leading to strain and overloading of bones muscles and joints.

Setting up a workstation at home

An ergonomic home office needn’t cost an arm and a leg

While companies spend lots of money for providing ergonomic work environment you can set up a reasonably good home work station with a few simple guidelines. Look at the adjoining picture for the basic details.

Have you ever suffered from an exercise-induced injury? Well, you are not alone. Read our blog on gym injuries here

Obviously a standard computer table is the ideal solution for home office. Dining table works fine too, as long as the body is maintained in alignment. I see many people use laptop out of bed or while sitting on sofa. Sometimes the coffee table is used to keep the laptop. All these can increase the stresses on the neck significantly.

Slouch sitting is the number one cause of posture related back pain. Elevating the laptop height can help align the spine and lessen the stress to a large extent.

An easy solution would be to use a small table or stool to elevate the laptop.

Keep things handy

Keep the essential items that you use in your office regularly within arm’s reach. this probably includes stationeries, mobile chargers among other items. Also keep a bottle of water close by. It is important to keep you hydrated at frequent intervals to keep your muscles healthy, more so when you are not working from your usual comfortable environment. Additionally the ambient lighting and reduced noise in the environment go a long way in reducing stress and improves concentration.

Common posture issues and solutions

Most of my patients who work with laptops for an extended period of time suffer from neck or upper back pain. The other group of people who turn up regularly in our HSR Layout clinic suffers from low back pain. Although other conditions like carpal tunnel syndrome or tennis elbow are also prevalent but they are not as commonplace.

Exercises to prevent neck pain:

Chin Tucks

Chin Tucks are the best for maintaining neck health

Chin tucks are wonderful for maintaining the health of the cervical spine. Keep the movement horizontal. If you are doing chin tucks for the first time you may feel uncomfortable. If that is the case do chin tucks lying in bed. Considering your working from home access to a bed should be such a big problem.

The back pocket stretch

In standing straight touch your left hand to the right back pocket. Now tilt your head towards the right side until you feel a comfortable stretch on the left side of the neck. You can use the right hand to pull the head further however be careful as this produces a stretch which is much stronger. Hold it for 10 to 15 seconds.

Repeat the stretch for the other side too. It is no abnormal to have a different range of motions on two sides. Do not stretch so hard that it produces pain.

Exercises to prevent back pain

Slouch and over correct

Slouch and overcorrect

This exercise was devised by Robin McKenzie of New Zealand, a legend in the field of back pain management. This exercise aims to maintain spinal mobility and prevent dehydration of the inter vertebral disc ( same disc is involved in slip disc).

Extension in standing

Extension in standing

With your feet shoulder breadth apart. Keep your hands in the belt line and bend backwards pushing your abdomen forward. Common mistakes include bending from the knee bending the head backward not bending the back enough.

Either of the extension in standing or slouch- over correct needs to be done 10 times every 2 hours.

Why is it important to maintain a Straight spine?

Head, shoulder and hip should be in a straight line

When the body is straight the body weight is balanced evenly and the load on the muscles is minimum. On the other hand a poor posture strains the muscles.  The common slouch sitting posture (or a forward neck posture) puts lot of weight in the front so the balancing needs a great deal of extra muscle action. For example if the head is forward by 2 inches the neck muscles need to put an extra effort of a 8-9 kgs. Ideally a good sitting posture should have the ear, shoulder and hip in a straight line. Checkout this post by Dr Sonal Mathur to get more insights on importance of upright posture.

Use of a lumbar roll

A humble lumbar roll goes a long way in maintaining good posture

It takes a lot of muscle effort to sit straight for a prolonged period. The use of a towel roll can make it easier. A simple bath towel rolled and fixed using tape or rubber band can be put in the Hollow of the back (Just above the waist line) to maintain correct position. Ready made lumbar rolls are also available in the market.

Other challenges

The present lockdown due to Corona outbreak has already lasted more than a week. A prolonged work from home schedule like this is likely to bring myriads of other challenges. Lack of mobility leading to stiffness, absence of sun exposure leading to vitamin D deficiency etc are to name a few. A combination of healthy diet, a regular time table and some indoor physical activity are some of the strategies to counter them. If you have any other queries related to posture or ergonomics feel free to ask in the comments section.

About the author

Dr Subhanjan Das (PT)

BPT, MPT (MSk & Sports), CMP(NZ), Diploma in football medicine (FIFA)

Consultant Physiotherapist of Apollo & Reliva Clinic, HSR Layout, Bangalore

Contact: +91 8967549104

Dr. Subhanjan Das (PT) has over 14 years of clinical and 12 years of academic experience.  A friendly professional with lots of patience and skillful hands, Dr. Subhanjan has worked with thousands of his patients for instant relief of pain and rapid return to activities.  He has treated elite athletes for recovery, injury prevention and performance enhancement.

Dr Das is specialized in Orthopaedic and sports physiotherapy and has kept himself updated with the latest advancements in the field of physiotherapy. He has undergone training on advanced orthopedic techniques such as Dry Needling, Mulligan Concept, McKenzie method, Pilates, Cupping therapy, McConnel and Kinesio taping from the best faculties around the world.

Dr Das has taught in 5 universities across India and has trained physiotherapists in 50+ workshops within and outside India.

Gym induced injuries are on the rise: Observations of a physiotherapist from Bangalore

Let’s look into a bit more detail on what exactly is happening here and how best to address this problem. 

Too much too soon

Primary reason these injuries happen is because of unaccustomed sudden stress. I see most of these injuries arising while performing Zumba, HIIT, or similar kind of high impact activities. While jumping the load on the legs is multiple times over the bodyweight. Joints and muscles need to absorb these stresses to land safely. While children, athletes and active individuals develop strength and coordination to perform perfect landing, people who are out of practice may injure themselves in the process.

In many gyms the members train in a group exercise format. While a regular exerciser performs the routines easily a rookie (or someone who is joining after a significant break) has to push him or herself beyond their capacity to keep up. The unseasoned muscles give up sooner or later and that’s when the injury happens.

Choose wisely

Most of these injuries can be prevented with few sensible choices. Choose your workout level appropriately. Some gyms let you select from a variety of workouts. Many a time we end up picking an exercise that is too hard for our level of fitness. Ideally in the first 6 weeks of workout one just needs to concentrate on establishing a routine of being active. During this period avoid choosing a high impact activity. Also in any half decent gym there are trainers. Sit down with them, explain your present health status and decide what should be an appropriate and safe level of exercise for you to start with. Then stick to the plan.

Rest to recover

I see a lot of people overlooking the importance of recovery time. One of my patients, a 37 years old lady & a mother of two lovely kids, had developed plantar fasciitis (heel pain) after attending Zumba classes everyday for 3-4 weeks. She found the hard way that one can be overdosed on exercises too.

Many of us fail to recognise the importance of adequate rest in developing and maintaining a healthy body. A beginner should exercise only three to five times a week and at moderate intensity. A daily workout plan consisting of same type of exercise every day can be a recipe for disaster.

The patient informed me that her gym provides a monthly subscription plan where she is free to choose as many classes as she wish. She registered for Zumba everyday to maximize the ROI! In such a situation it would be wise to adopt the strategy one uses in a buffet dinner. While the food is unlimited the capacity of our body is not. 

Shoes

A single pair is hardly enough for different sporting activities

While doing exercises like Zumba, HIIT or aerobics the most important exercise equipment you must focus on is the correct pair of shoes. The right pair reduces the joint stresses, improve stability and overall has a significant contribution in injury prevention. Also if you are jumping, running, jogging or dancing the surface on which you are performing these activities is of utmost importance. Hard surface like concrete road or tiled floors significantly increases the impact forces which can produce injury over a period of time or at once. Ideally a gym floor should have shock absorbing mat. Otherwise the importance of the shoes increases further. Mind you, a single pair of footwear is usually not appropriate for different kinds of workout.

Other features

Hydration is an important yet often overlooked factor. Not drinking enough water leads to cramps and injuries. Inadequate or incorrect warm up and cool down is another contributor to gym induced injury.

Treatment

Most of these injuries fall under the categories of ligament sprain and muscle strain. Typical treatment consists of periods of rest (sometimes along with plaster/sling/braces) and medication, alongside supervised physiotherapy with a well designed protocol. The initial phase consists of pain and inflammation control, followed by graded exercises to regain mobility, strength and coordination. Sometimes adjuncts like tape, dry needling or cupping etc are used to accelerate the healing process.

Taping accelerates recovery

Recurrent injury

In my clinical practice at HSR Layout what alarms me is the number of recurrent injuries I encounter: Patients who seemingly have recovered go back to gym only to return with same injury again. The commonest reason for this is not completing the rehabilitation process. Majority of us consider ourselves recovered when we cease to have pain. However, getting back to pre injury levels need a lot more effort. Let’s take the example of Amit (name changed) at 30 years with 92 kg weight and 6 feet height he is on the heavier side but far from being obese. Amit had injured his left ankle while performing body weight based high impact exercise. He seemingly got alright with few days of rest in an ankle brace and went back to gym, once he felt his ankle is back to normal. But within a few sessions he got the same injury once again. Unfortunately this pattern repeated a few more times.

Why does this happen? Muscles, ligaments and other soft tissues not only provide structural stability, but they also have important sensory function. Consider a simple example: you performing side stepping in a stepper.  While stepping down your body needs to calculate the exact angle at which the ankle is placed and how much it needs to move to have a safe landing angle. Brain instructs the muscles to contract just enough to reach that angle. This must happen within the short span between when your foot leaves the step till it reaches the floor. When the ankle ligament is injured the important sensors ‘forget’ how to make measurements and calculations efficiently resulting faulty landing and re-injury.

Exercises in an unstable surface is essential for ankle rehabilitation

Amit needed to go through the process of re-learning of movement. After the initial hands on treatment sessions were over he learnt the exercises and practiced at home. Periodical revisions were done where I increased the challenges. Within a few weeks he completely recovered and could join back in gym. It’s been over two months since then and he reports steady progress in his gym and no recurrences.

To sum up

Gym induced injuries are becoming increasingly common and a multitude of factors are responsible.With common sense and sensible choices these can be prevented. In most cases the recovery is 100%. Trust your physiotherapist for the NOC before you return to the activity to prevent recurrence. Finally do not push your body beyond capacity. Rome was not built in a day. It is impossible to build a six pack over night but very much possible to get hurt trying.

About the author

Dr Subhanjan Das (PT)

BPT, MPT (MSk & Sports), CMP(NZ), Diploma in football medicine (FIFA)

Consultant Physiotherapist of Apollo & Reliva Clinic, HSR Layout, Bangalore

Contact: +91 8967549104

Dr Subhanjan Das (PT) has over 14 years of clinical and 12 years of academic experience.  A friendly professional with lots of patience and skilful hands, Dr Subhanjan has worked with thousands of his patients for instant relief of pain and rapid return to activities.  He has treated elite athletes for recovery, injury prevention and performance enhancement.

Dr Das is specialized in Orthopaedic and sports physiotherapy and has keeps himself updated with the latest advancements in the field of physiotherapy. He has undergone training on advanced orthopaedic techniques such as Dry Needling, Mulligan Concept, McKenzie method, Pilates, Cupping therapy, McConnel and kinesio  taping from the best faculties around the world.

Dr Das has taught in 5 universities across India and has trained physiotherapists in 50+ workshops within and outside India.

Exercise Prescription for Osteoarthritic Knee

Osteoarthritis of knee is the commonest of the joint diseases in India. Even conservative estimates put the prevalence rate at 22% and the number goes up to 70 percent in age specific population (above 65 years). How do our people tackle such a widespread problem? Among people who have access to healthcare services most are treated with pain killers. Many consume supplements like glucosamine or chondroitin. A significant number of patients also opt for more intensive form of treatment like knee replacement surgery. However many sufferers are ignorant of the fact that a key component of efficient OA knee care is self management. In fact the number one recommendation of American Academy of Orthop aedic Surgeons (AAOS) is to participate in self management programs like strengthening or neuromuscular training. A carefully designed exercise plan thus goes a long way to help patients alleviate their suffering.


In this post we offer a set of nine exercises which are easy and effective in mild to moderate osteoarthritis knee.

One: Isometric Quadriceps exercise


Sit on a firm surface with straight knees. Roll a bath towel and place it under your knees. Now press one knee downwards towards the towel by tightening the front of thigh muscles.  Hold for 10 seconds, without lifting the ankle. Repeat with the other knee. Avoid breath holding and breathe normally while performing this exercise.

This is a staple exercise for OA knee. Start at ten repetitions each leg per set, sets three sets per day (morning, noon, evening).

Two: Quadriceps drill/McKenzie knee extension


Sit comfortably on a chair. Then gradually straighten one knee, keeping the toes pointed upwards and outwards (Great toe at 2’O clock position). Once straight the front thigh muscles are tightened as much as possible for 2-3 seconds.  Then bring it down and repeat on the other leg.

Perform this exercise 10 times every two hour.

Three: Straight leg raise

Lie straight on your back. Now lift one of your legs up, at about forty-five degrees.

Keep your knee straight and toes pointed upwards. Hold the position for ten seconds and then bring the leg down slowly.


Perform this exercise ten times per set, three sets per day (morning, noon, evening).


Four: Ply VMO Training


VMO is a very important muscle  present next to the knee cap on the inner side. To activate VMO Stand upright, leave a little gap between two legs. Then rotate the feet outwards, as it is shown in the picture. From this position, bend the knees a little, not more than twenty-thirty degrees. If you are low on balance you can grab a chair to prevent yourself from falling down. Start with a set of 3, you can increase once accustomed. Perform three sets per day (morning, noon, evening).


Five: Modified ballet Third-(VMO Training)


The feet need to be positioned correctly to train the VMO efficiently by this exercise. Start at the normal standing position and turn the right feet 45 degrees outward. Now place the heel of the left leg touching the inner border of the right leg between the heel and toe. This leg too is rotated outwards 45 degrees.

From this position push your feet to eachother and  bend your knees just a few inches and straighten up. Perform this exercise throughout the day, whenever you get a chance.


Six: Patella Mobilization


Sit with straight legs, keeping a towel below the knee. Then hold a knee cap by thumbs and index fingers of both hands.  Now slide the knee cap left and right slowly maintaining the same grip. Similarly move it up and down as well. Do this 10 times in each direction.


Seven: Calf Muscle Stretch


Sit on a firm surface keeping the legs straight. Now use a folded towel or belt to hook upper part of your feet. Pull the foot towards you, keeping the knees extended. You will feel a stretch in your calf. Do this one leg at a time, keeping the stretch for 15 seconds. The pull should be strong but not to the extent of producing pain. Repeat this 3 times a day.


Eight: Posterior capsule Stretch

Again the starting position is sitting with knees extended. Make a towel roll like exercise 1, but this time put it below the ankle. Now press down with your knee, trying to touch the back of the knee with the resting surface. Hold this for 15 seconds. Repeat 10 times every two hours.


Nine: Balance Exercise


Stand next to a wall (for support) while keeping both the feet along a straight line. Now leave the wall support and count how many seconds you can stand in this position. Go easy on yourself with this one, avoid falling down.


Epilogue

If exercises increase pain, avoid them. Visit a good physiotherapist, they know best when it comes to therapeutic exercise.

In addition to exercises on the knees, manual therapy can provide early and lasting relief. Physiotherapist is the authority here too.

Exercises and lifestyle changes can control your knee pain and prevent worsening of your condition.

TC!

About the author


Dr Subhanjan Das (PT)

BPT, MPT (MSk & Sports), CMP(NZ), Diploma in football medicine (FIFA)

Consultant Physiotherapist of Apollo & Reliva Clinic, HSR Layout, Bangalore

Contact: +91 8967549104

Dr Subhanjan Das (PT) has over 14 years of clinical and 12 years of academic experience.  A friendly professional with lots of patience and skilful hands, Dr Subhanjan has worked with thousands of his patients for instant relief of pain and rapid return to activities.  He has treated elite athletes for recovery, injury prevention and performance enhancement.

Dr Das is specialized in Orthopaedic and sports physiotherapy and has keeps himself updated with the latest advancements in the field of physiotherapy. He has undergone training on advanced orthopaedic techniques such as Dry Needling, Mulligan Concept, McKenzie method, Pilates, Cupping therapy, McConnel and kinesio  taping from the best faculties around the world.

Dr Das has taught in 5 universities across India and has trained physiotherapists in 50+ workshops within and outside India.


Cupping: Good, Bad and Ugly- A Talk Delivered in SIP Conference 2017

Cupping has a long legacy. It had been mentioned in Egyptian scriptures as old as 1550BC. Prophet Muhammad recommends it in Hadith. Hippocrates had mentioned about it in his books.

A. Dry Cupping: Simple, run of the mill cupping. Vacuum can be created in various ways to latched the cups to the skin for desired duration.

Dry Cupping

B. Mobile cupping: The cups (and the suction force) are dragged over the surface of the skin. Kind of effluerage, but with negative pressure.

Mobile Cupping.  The cup is moved on The body surface. Another variation is,  when the patient is asked to move the body part with cups on them!


C. Flash Cupping: Cups are attached and withdrawn immediately.

Flash Cupping

D. Needle Cupping

Needle Cupping

E. Herbal Cupping: The cups are heated with herbs.

Herbal Cupping

F. Water Cupping: Needs a lot of manual skills!

Water Cupping

G. Wet Cupping/ Hijama: Blood letting Cupping

Wet Cupping

How does cupping work? There are multiple theories.

Cupping in Traditional Chinese Medicine  style is based on Meridian system.

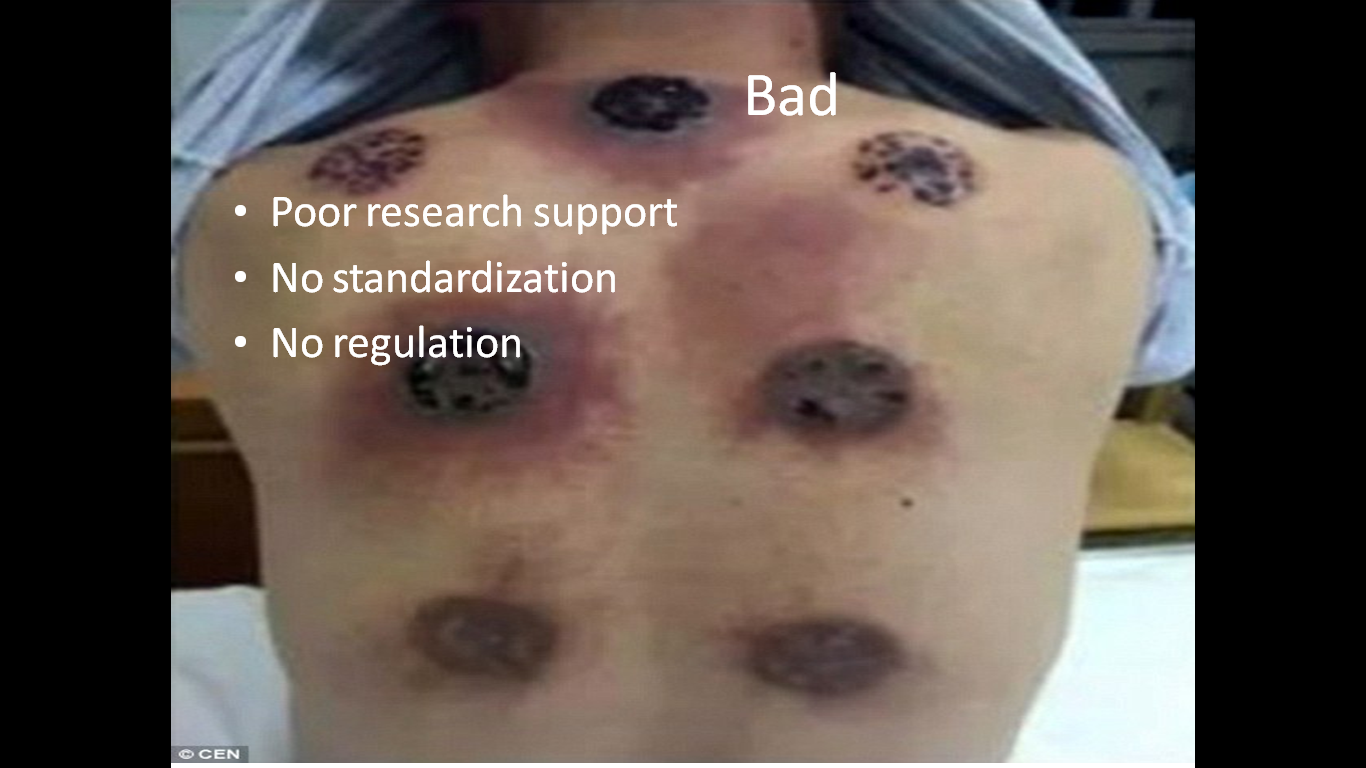
Wet Cupping supposedly removes the harmful waste materials from the body.

There are even elaborate theories on diagnostic significance of residual cupping marks. Impressive?

By far the best scientific evidence comes from UCSF. By the way, they don’t call it cupping. “Myofascial Decompression Therapy” is the name they use. Old wine in new bottle?

The marks on Michael Phelps are from this particular form of therapy.

There are a few research articles that validate Cupping

However, as you can see, good quality studies are hard to find.

There are quite a few reasons why a physio should consider incorporating cupping in their arsenal

Although vacuum therapy is hardly a new entity in the field of physiotherapy

Hurdles that a physio face while justifying cupping


So while cupping is an exciting tool in the field of manual therapy a lot of issues have to be sorted out before it can be called a mainstream physiotherapy modality. The onus is on the practitioners and propagators to justify it’s use.

(more…)

Dry Needling Assessment form

Assessment and recording of Dry Needling is an integral part of a DN session. However, there is no standardized procedure. Hence I have made this form, which should make the whole documentation process easy to record and retrieve.

This form is dry needling specific and not a complete assessment form by itself.

You can download the form here


SPIDER: Needling with the web of safety

One of the major dangers associated with dry needling is pneumothmorax. Although documented cases are rare a needler should still exercise utmost precautions because of two reasons. First, it is a serious, even potentially fatal hazard. Second, the margins of safety are low. One article reports iatrogenic pneumothorax caused even by a dry needling instructor with 45 years of experience, so one should always take enough measures to ensure safety while needling around the thorax.

SPIDER is a combination of six very important steps which I believe would provide significant protection against the risk of pneumothorax (and also other needling related adverse effects like nerve damage or injury to the hollow organs). I would recommend going through these measures mentally every time one needles a patient.

S-surface anatomy

It is always a good idea to review the anatomy of any structure that you are going to needle. To prevent pneumothorax ALWAYS review the surface anatomy of pleura before needling around chest wall.

The Pleura extends into the neck superiorly, from the medial 1/3 of the clavicle to the sternoclavicular joint. The apex lies about an inch (sometimes higher) above the clavicle.  One should be careful in while needling the structures here as the pleura can be just half a centimeter below the skin for lean individuals. The superior part is bound laterally by first rib. As it does not enjoy the protection of the ribs in the top where only covering is Sibson’s fascia, it is very easy to damage the pleura at this area. Remember the entry scene of Achilles in the movie ‘Troy’? He killed the giant with one clean strike by digging his sword precisely in that area.

Pleura also needs to be avoided diligently while needling the structures in the back. The medial margin of the pleura extends along the transverse processes of C7 till T12, sometimes L1. The book “Trigger point dry needling” by Jan Dommerholt mentions a ‘safe needling zone’ which is about a finger width lateral to the spinous process. Needle anywhere beyond that and you have a risk of reaching the lung.

P-position

Be mindful of both patient’s position and the position of the needle. One should be aware that with alterations in body position the arrangement of muscles gets changed in surface. For example in prone lying if the arms are kept forward the lower border of the trapezius muscle shifts superior and somewhat medially. Similarly, with posture change the ribs may open up more (e.g. in side lying if the arm is abducted, to needle serratus anterior).


The needle should be positioned over the skin with precision before tapping it in. If possible move the target tissue over a rib. Travel and Simon has also recommended fixing the target tissue by keeping one finger each in upper and lower intercostals spaces of the rib. The needle should always be positioned away from pleura and other vulnerable structures (e.g. femoral nerves, while needling the adductors.)


I-incidence Angle

Incidence angle is the angle at which the needle is inserted. While needling structures like rhomboids the angle should be very narrow, almost parallel to the skin to avoid pleura. For the muscles that attach to scapula it is usually recommended to aiming the needles towards the bone which stops the needle like a shield and protects the pleura.

It is important to recognize that at the same point of entry a wrong incidence angle can easily reach the pleura and create problem, for example, whie needling the thoracic multifidus in the ‘safe needling zone’ if the needle is angled laterally (instead of the recommended medial direction) it will definitely puncture the pleura. Similarly, while needling the piriformis directing the needle away from the sciatic nerve will be essential.

Correct incidence angle is also important for needling the correct structure.

D-depth

The depth of the target tissue should be judged and the size of the needle should be selected accordingly. The needler should have a fair bit of idea about the depth of the tissue and needle should be advanced no further than necessary.

If you are not comfortable inserting the needle at a depth stay superficial. You will still give the patient A delta mediated analgesia and there is a fair bit of possibility that the trigger point will get resolved by SDN mechanism.

E-educate

While taking the informed consent the patient should be educated about the potential adverse effects and how to identify them whether they are simple soreness or pneumothorax. Many a times pneumothorax can develop after a patient has left the clinic. This article reports a case of pneumothorax which was developed about six hours after dry needling. The article also mentions the symptoms of it as the patient (a medical doctor) experienced them. The patients should know what action they need to take if the adverse effects appear.

One should also educate the patient about the do’s and don’ts after needling. A small poke to the pleura may remain asymptomatic and heal itself if the patient avoids heavy upper limb activity for the remainder of the day of needling.

R-record

Like any manual therapy sessions needling interventions should be recorded. Every relevant detail need to be mentioned. I have created a simple dry needling recording technique which I will post soon.

While practicing SPIDER will definitely reduce the risk of pneumothorax and other adverse needling effects while needling, be weary of at risk population. Patients who are lean individuals, have a history of emphysema or other lung diseases or have chest wall deformities are not the best candidates to receive DDN on the chest wall. Above all, remember this maxim from Benjamin Franklin: When in doubt, don’t.